Showing posts with label 1st Finish. Show all posts

Saturday, January 25, 2014

Coin Quilt

This baby coin quilt is my first finish of 2014 and most likely my oldest UFO. It is probably 5-6 years old? Not very old for some quilters but I haven't been quilting for very long either.


When I first saw a coin quilt I fell in love with them. A great way to showcase each fabric without having to have yard pieces. I've also found out they are a great way to use up some scraps too. I did a little straight line quilting and then decided to free motion some flowers into the white spaces. It has been a few months since I did any free motion quilting and I sure did feel a bit rusty. I love the way a quilt gets all wrinkly after a run through the washer and dryer.


We had a very windy and cold day here again. The wind was very helpful in showing the back of the quilt. It's a nice blue fabric with little houses all over it.


Robin L. - 1 finish for 2014


Wednesday, January 30, 2013

Finally Finished!

It's over sixty degrees outside (55 degrees warmer than last week!) and I just finished putting buttons on a snowman!  This was suppose to be on my door in November but the Holidays happened.

My first finish of 2013:

What to finish next?....the possibilities are endless.

Monday, January 23, 2012

My First Finsh

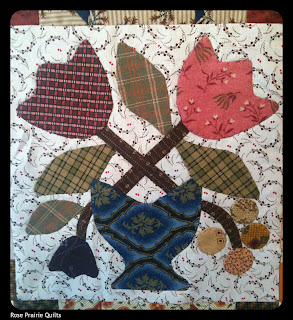
Finally I can say I finished a top.
Hi I'm Kathleen from Rose Prairie 
Quilts and Farm in Oklahoma. I live on over a hundred acres with "the man of  the place". Kids are grown and live in other states. But we do have beef cattle and "my girl" (my chickens).
I love to quilt, knit and grow vegetables.

 This quilt seemed like it took forever on this one.
Grant cha there was a lot of appliqueing but seeing how it was a commission top for a shop, it took some of the fun out of it for me, felt pressured by time.
 This pattern is Heritage Sampler by Lori Smith. This is all I was asked to do, you see there is a border that should be around. One of half-square triangles.


 I love to applique and I enjoy stitching on one but I also like to my time at it. 


I did a method by using Ricky Tim's paper and stitching it on the machine. I did it that way so I would give it the look of needle turn. I have a tutorial on my blog if you would like learn this method. Go here
I hope to have another top done this week. If I do I'll be back with another show and tell.
Till next time
Kat
=^..^=

Tuesday, August 2, 2011

1st finish- trip around the world dollquilt

8 months passed and my first finish is a fact.


This one isn't meant for Joris, but doesn't he look cute this way? It's Pippi's doll quilt.
I made this quilt with the leftovers of a bigger quilt that I still have to finish. But I made progress on that one; all borders are attached and the sandwich is made and I have even started quilting (during summer quilting this one is quite hot so I've postponed that to colder days).


Making the sandwich used to be something I didn't like, so tops became UFO's but after having read about the micro stitch on a blog and having this tried out this problem disappeared.
What helped as well is having a design wall behind my bed. I made great progress on tops that were put on.
I hope these tips can help others.

More finishes on the way!
Diana

Wednesday, June 1, 2011

Finally a finished Quilt!!

This quilt has been about 18 months in the making.  Started off making a table topper in the same colours - Moda Beach house (??) and I liked it so much decided that I'd like a quilt.  I used a charm pack and a layer cake.  To make the quilt bigger I added in the sashings and borders.  It was a fun quilt to make and quite easy but it sat for so long waiting for the borders to go on.  Finally on the weekend, I completed the borders and yesterday quilted it.  Last night was spent doing the binding.  I only quilted in the ditch - simple enough and I thought with the colours it didn't need a lot more.  I intended to cut the binding on the bias for a slightly different look against the border - but it just didn't work out and I knew that I was going to waste the fabric if I kept going, so it's a traditional binding.


I can finally put something on Sew it's Finished blog!!  Yeh!!

Thursday, May 19, 2011

4 Quilt Tops Done

Thank you to Wendy for inviting me to participate in this blog. I just wanted to show you all that this week, I have finished 4 baby quilts for little ones that survived the tornadoes of Alabama (United States) and their families did not.

Having this blog on UFO's helps me to complete my quilts and get rid of some of my stash as I feel accountable to all of you who are working so hard to complete your UFO's.

Simply put, this is a great support group for all of us quilters who say we never have the time to finish anything.

I have found a new home.

If anyone wants to stop by my home blog check out the Quilting Ranny at:
http://www.quiltingranny.blogspot.com

Sunday, May 8, 2011

My first finished this year and it is a re-finish

About 5 years ago I made a "Jeu de l'Oie" wall hanging from a pattern in "Marie-Claire Idees" for the birth of my friend's daughter. The "Jeu de l'Oie" is a traditional French board game.
The quilt took a few months to make as I did all the applique in each individual "square" by hand. She received her present when she was about 6-month old.
My friend hanged the quilt in her daughter's bedroom. However they remodelled their house about 2 years ago when baby # 2 was born and the quilt was too big for the new bedroom. As there was quite a large "border" around the quilt, my friend asked if I could trim the quilt to a smaller size. Of course I agreed and took the quilt back to reduce its final size. I took the binding off and trimmed the quilt off last year in the Spring. I then sew the binding back on again. Once the binding was on, I realised that I had stitched it to the back of the quilt rather than the front. I hate unpicking so I decided to try a decorative stitch on the front to finish the binding, also thinking that would be the faster option. Well, it looked awful and I really hated it. I only did half of the side length but the binding was moving slightly and the stitches were not consistant so that meant more unpicking to do :-( I was so annoyed with myself that I put the quilt aside and didn't touch it again until about a month ago when I was determined that the quilt would go back with my friend next time we saw each other (which was planned for last week-end). I took the quilt with me when we travelled back to France for our holidays and spent the journey unpicking my horrible decorative stitch. When that was finally over, I could sew the binding back on, making sure I put it on the front of the quilt this time. I blind stitched it on the way to our week-end and finished it off during the week-end so that I could finally hand it back (about half an hour before we all left).
Anyway, I am really pleased that I could hand it back over to my friend and that meant I could also cross this long-standing UFO off my list.
Celine

Friday, April 1, 2011

Finally

Finally I am also able to show you a project. A WISP which I did finish this week. You are mosty welcome to visit my blog to read more about this little quilt.

Sunday, March 13, 2011

A couple simple pillows...

I really love that this blog exists! It has been great to see everyone's completed projects and be inspired to get back into sewing!

This poor little pillow's stuffing has been beaten down, so it is nice and soft...a wee bit too soft!

I have had some sample squares of fabric that I purchased for next to nothing! Seriously! A furniture store was closing down last summer and my hubby and I saw the samples in a corner... We picked out about 20 squares (17x17 inches each) (some printed and some plain) for a couple of dollars! None of them were identical, since they were samples used for customers to choose fabric for their furniture and accessories.

This past Weds, I didnt have to work, so I went to Hancock's fabric and bought some decorative rope trim. Last night, I sewed one pillow and this morning, I did the second one.  I had old pillows that I used the batting or filler from....so these cost $7 for each pillow (The cost of the trim was the most expensive  part).

And here is the back...the fabric for the back is sooo soft!
 ...just in time for our younger daughter and her boyfriend's 
long 10 hour drive to our home. 
(my hubby and I get to meet him for the first time) 

And thank you to those that answered my question previously about what sewing machines you use. I have been looking and looking and having a hard time deciding! I love quite a number of the machines that were mentioned, but some were more expensive than I felt I should spend.

I did decide and purchase from Overstock.com this Brother brand.   (It was on sale and with free shipping.) So...yay! I was able to try it out for the first time on these pillows! And it worked great! (I had given my old machine to our older daughter, so have been without a machine for about a year!...a big reason that I have mainly been hand quilting :o)
Here is my machine. ...it is very easy and the manual gives great instructions! (It comes with a rolling carrying case too :o)


Oh! many of you are familiar with models that can do many things, but I was amazed that they make sewing machines that can really thread the needle!  haha...Yay for such brilliant people that invent things like that!

Also thank you so much for all you experienced quilters that have answered some of my questions! 

Have a wonderful weekend!
Blessings & Aloha!

Thursday, January 27, 2011

And sew I've finished one........

Finally, with the month nearly over I have my first Sew It's Finished finish.   I started it in 2008, and only had to sew on the dragonfly button, sew the final seam and stuff it.  I know - what is wrong with me - it took me all of about 20 minutes this morning.  So now, finally I can add one to the tally!


This is In My Garden Needleroll by Shepherds Bush. Isn't the little dragonfly a sweetie?  The verse says, "In my garden, gently grow, buzzing blossoms, row by row."
  
There's been some beautiful finishes here already - keep up the good work girls....... happy stitching ...........
Nicky
http://farmgirlstitching.blogspot.com/

EDITED TO ADD:  I have changed the font in this post as it seemed to come out very small and was unreadable to some.  Apologies, not sure what happened, but hopefully this is now fixed!  Thanks

Tuesday, January 25, 2011

1st finish for me!

What an amazing effort ladies...
Pat yourselves on the back!
So many finishes...

 Wendy and I challenged each other 
to finish some projects that have 
just sat around forever..he he
Waiting waiting  to be finished!
 Then this blog was born for others to join us.
 and I am happy to say you have been a huge encouragement.
 I have now finished my 1st UFO!
Pattern - Moda Bakehouse Here
Fabric - Mill House Inn.
 Time to complete - One year..

 Now to make the next one...
 Hugs Dawn x x x

Monday, January 24, 2011

My First UFO off the list!

Phew....this was a marathon of a quilt.

A friend asked me to make a quilt for her sister who was due with a girl in January....the first time someone would be paying me for a quilt! Of course I left it to the last minute and I made this whole quilt from start to finish in 2 days!


All washed and crinkly it measures 40x52in


It was certainly hard to give this one away!


 My friend loved it! Which I was just so relieved about.

Bliss is an absolutely gorgeous fabric line...I might have to make a full size of this quilt for my bed!

Happy Sewing :)

Erin :)

Thursday, January 20, 2011

I have finished something!!!!!

Good morning ladies.  I have finally finished a sewing piece...this has been waiting to be quilted for ages!
It wasn't even on my list; forgot about it..a Christmas table runner was in a corner of my sewing room; hiding.lol......setting up a quilt for a lady today also. It wasn't on my list either; she just brought it to me yesterday.....perfect timing,eh!!

Here is the runner........I quilted it on the machine...
keeps me practicing some stippling....which I am not
great at either, but I find it fun for a change.....

Monday, January 17, 2011

One down ??? to go

Hi my name is Michelle and I am a fabricaholic and I have lot's of UFO's!!! I am hoping this is the right place to get myself sorted and relieve myself of some of my UFOs. I am sew pleased Dawn and Wendy are here to be our mentors and guides as we travel down this path together. I hope to be an encouragement to you and I know you will all inspire me in return! Today I would like to share a wee finish that has been in my UFO pile for over a year...

This is actually the second time I have made this bag, the first one I gave away in a swap and I loved it sew much I just had to make my own. I have been very busy sewing this past week and have several other finishes but none from my UFO list:o( I am working on it though! If you would like to see what else I've made please pop over to my blog http://michellespatch.blogspot.com/

Until next time keep stitching...

hello quilters, sewers,creative people!!!

Hi, my name is Leeanne, Firstly a big thank you to Dawn and Wendy for inviting here. 


Finish #1...Susan Claire mystery quilt that I started a couple of years ago.It was finished as a top for at least a year before I got to quilt it, but it is all finished and ready for next Christmas (with no comments that it is NOT quilted!)


Finish #2 ....Sue Daley table runner that was featured in the Australian Homespun magazine.From my stash I managed to find fabrics that looked reproduction and English paper piecing I went!

Well lets all wish each other well for getting some of the backlog FINISHED!!!!!

A Girl Adds a Finish

Finally, a finish to add to the list.  Though it is not off the list I posted earlier.  It is a project completed and it is out of my sewing basket. 

A friend of mine made this awesome I spy Quilt for her daughter, but was having trouble with the binding and asked me if I could help.
It got me to thinking....sometimes the hardest part of the quilt is the finish.  For some it is the quilting.  So they send it off to the quilters, and it comes back as a masterpiece. That's great, but what if the binding is the only thing that prevents you from having that perfect quilt?  You can't just send it out to the binder. 

I have tried many different methods, bought books, searched the Internet and even taken a class, and now I know what works for me.  I have taken a little from each and made it my own.  So, I thought I would take a minute and share how I bind a quilt. 

First, I cut 2 1/4" strips.  I don't cut them on the bias though I know I should, honestly I'm just a little lazy about it.  Then with wrong sides together I iron the strips in half the long way, and sew it on to the top of my quilt.  

Next, I hand sew the binding to the back of the quilt.  I don't pin or clip the binding in place, I don't need to, I just keep folding it over as I go along.  I start by hiding my knot in the salvage and bringing my needle out on the other side of my machine stitch.  I will use this as my guide.  Then I will use a ladder stitch (or some call it Jacob's Ladder) to sew my binding on. 


I used black thread in these photos so it would be easier to photograph and so you could see how the stitch disappears.  If you have any questions please let me know.  It is all about helping each other and getting these projects done.

Till next time,
A Girl in Paradise

Friday, January 14, 2011

My first fnish for 2011

I started this little quit at a retreat in November.  I added the corner triangles, and then couldn't decide how to quilt them.  I finally decided on a basket pattern!  I couldn't find a basket stencil, so I made my own with a couple of triangles and a plate.  The binding is even sewed down.

Tuesday, January 11, 2011

TWO FINISHES... WOOOO HOOOO !


ABOVE:  here are my first two 'finishes' for the year.
I started the STAR Quilt way back at the beginning of 2008, and now my 2nd son has it finally.
The Heart Quilt I started in 2009.. and my 3rd son now has it.
It's such a relief to get them done!

BACKGROUND ON ME:  I have a daily blog... where I yabber on about anything and everything... including weight loss, family, sewing.... well hell,  anything really!  I started sewing about 3 years ago... and realised I LOVED IT... so bought my first really good machine and have not looked back. 

I love sewing brights... I'm not a 'subdued' sorta person!  lol    I am not that good at quilting... I tend to just do long, wriggly lines on my quilts.... I'm scared to try anything else!  My machine does 'free motion' sewing, but I am crap at doing it! 
My machine was 'the machine from hell' for a year... constantly back in the shop due to jamming issues, but it seems to have settled down now, thankfully.  I still don't trust it that much...*sigh*

So, if you want, pop over to say 'Hi' on my daily blog!

Monday, January 10, 2011

Raggy Rose for Bec

My first finish off my list! Raggie Rose is a doll that I bought from KatkinsDesigns a few years ago, I intended to make her for my daughter but she doesn't seem to suit now. I have another doll kit from the same place and this doll is more suitable for my daughter now.
Raggie Rose is going to my Nan for her birthday. She loves dolls and has lovely dolls, but no rag dolls I believe....
Bec xxx

Hello

This is my first finish from my UFO-list. I had the pattern for almost two years. And now it's finished Yippie. I really love pincushions and I collect them, but collecting the patterns is going faster than finishing them. But I made a start.


The next few pitcures are some of my UFO's. A skull quilt for DS, it's waiting to be quilting. I promised my DS it will be finished before Christmas. So this quilt has priority, although it was made recently. The Schnibbles "Paganini"only needs quilting.

This is one basket with patterns of bags ( another collection) and the other basket is a little quilt from Jacqueline de Jonghe I need to finish.


This is one of many drawers of UFO's.

I hope to show a lot of my finished project. I can't show you all (DH reads also this blog).
Groetjes Mai